Flat Bottom V-Carving in Carbide Create

Home » Flat Bottom V-Carving in Carbide Create

Recently I published a video where I went into some of the math behind v-carving operations, and looked at a technique for doing flat-bottom v-carving on a Shapeoko3 in Carbide Create, a feature usually only present in more robust software packages such as Vectric’s VCarve. I’ll go through that process more in depth here as the video only demonstrated the concepts behind the technique but lacked a more step-by-step outline.

The Problem

V-Bits are most commonly fixed-angle bits that achieve a variable diameter cut at the surface of the material by varying the depth of the cut. The width of a cut and the depth of the cut are interdependent, that is for a given bit angle there’s only one depth of cut that will produce a given width of cut at the material surface.

The only true way to vary the depth of a cut is therefore to use a different angle bit. A bit with a more acute angle such as 30 degrees will always cut deeper for a given width of cut than a 60 degree bit, and a 90 degree bit would cut more shallow than either of those.

In the image above the red dots indicate the width of cut, all 3 cuts are the same width. A bit with a more acute angle such as 30 will always cut deeper for a given cut width than a bit with a wider angle.

The bits are of course incapable of creating a groove at any angle other than the angle of the bit itself, if a cut width requires a depth deeper than your material thickness then you simply can’t make that cut with that

A 30 degree bit works okay for the smaller square but goes right through the bottom of the stock on the larger square.

A Solution

The common technique for overcoming this, aside from using a bit with a wider angle, is flat bottom vcarving. In this technique the bit creates only a profile around the perimeter of the shape, then a square endmill can be used to pocket the interior. This technique retains most of the aesthetics of a traditional v-carve toolpath while allowing you to use thinner stock that wouldn’t otherwise support the bit angle you want to use.

Overall this technique is fairly straightforward:

  1. Trace the perimeter of the shape with the V-Bit
  2. Create an offset toolpath that pockets the interior of the shape

Determining how much to offset your shape requires a bit of math that I cover more in the video above, but the relevant formula is:

Offset = tan(Bit Angle / 2) x Desired Depth

You can also use my V-Bit Offset Calculator tool if you don’t want to work out the math yourself. This offset cut at a fixed-depth will produce a cut that stops on your shape’s contour


An Example

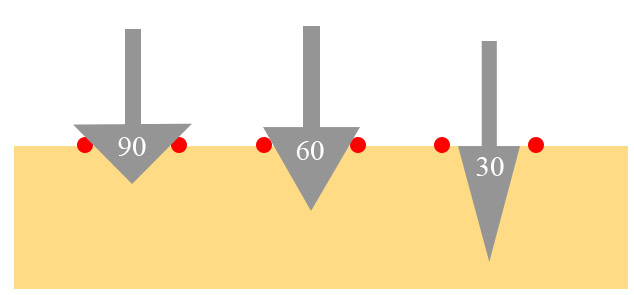
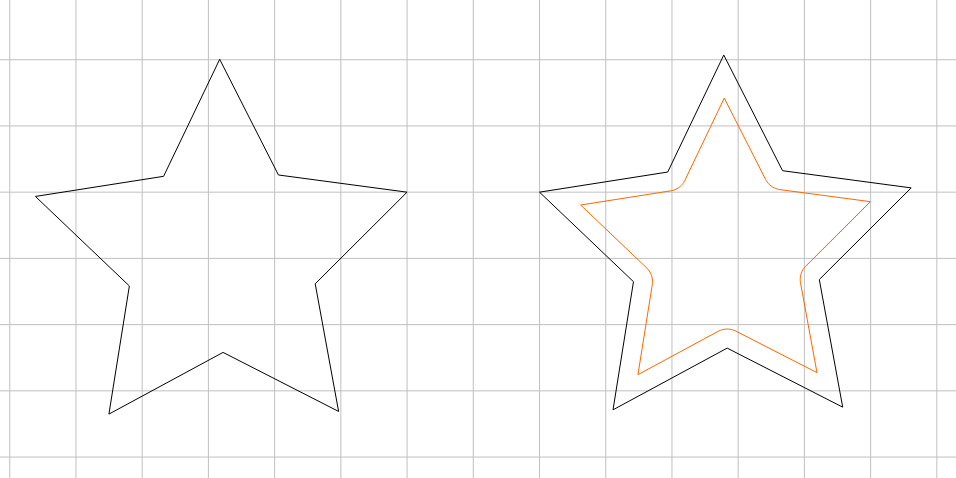
I’ve setup two stars in carbide create. With a 60 degree bit the simulation shows me carving right through my quarter inch thick material.

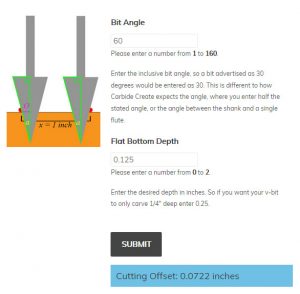
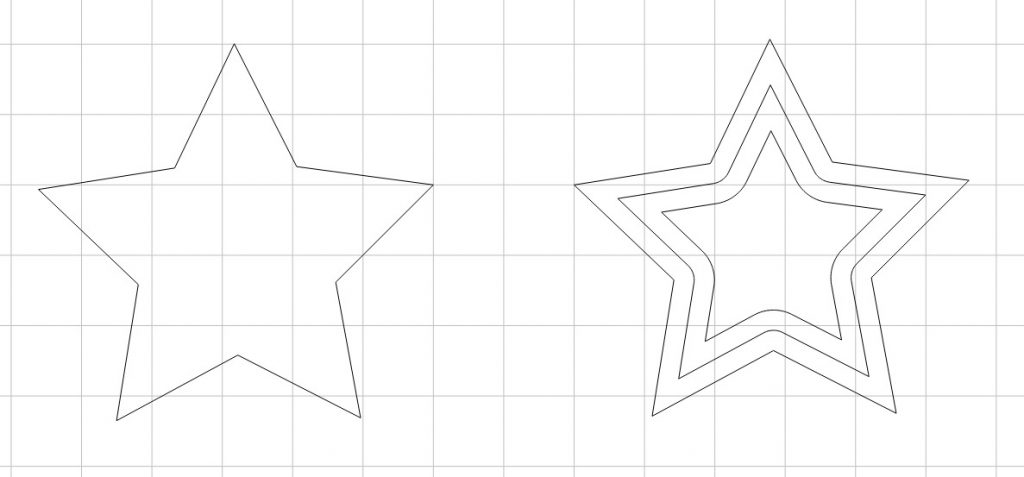
Let’s use the calculator to determine the offset for a 1/8″ deep cut using my 60 degree bit.


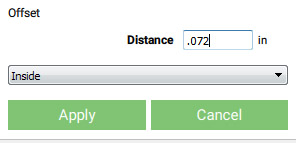
Once we’ve calculated the offset value we can use Carbide Create’s “Offset” tool to create new geometry on the inside of the shape.

The star on the right as added geometry added using the offset tool

Repeat this process a second time by doubling the offset and offsetting the original geometry a second time.

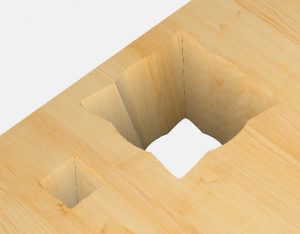
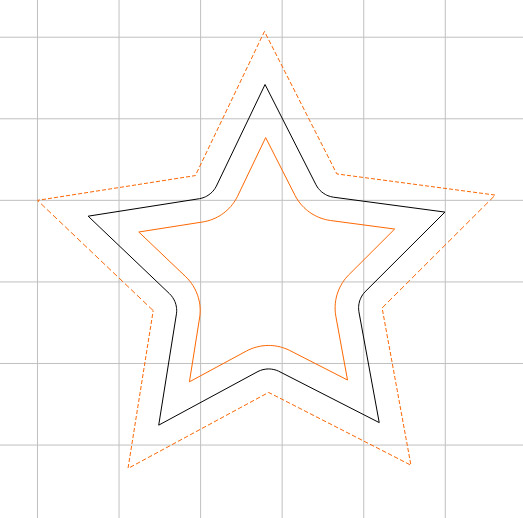
Now we can setup toolpaths. First we’ll create a pocketing operation with a 1/8″ endmill which cuts on the inside of the “middle” star, this will create our flat bottom.

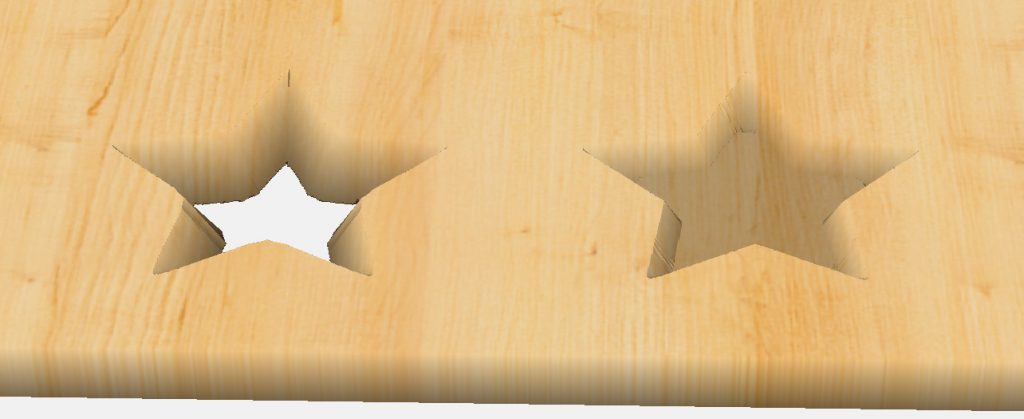
The final toolpath should be a vcarve between the inner-most and outer-most star.

And there we have it, a flat bottomed star in Carbide Create!

1 thought on “Flat Bottom V-Carving in Carbide Create”

  1. Good Morning Daniel
    Wonderful tutorial videos thanks, I have been fighting to learn how to do inlays. I have watched many videos and the term “Flat Bottoming” keeps coming up and your video has helped clearing 90% of my understanding. But there is a small thing that I am not sure about, I think I understand but want to ask you to be sure. When you generate the offset value do you reduce or increase the original artwork by that amount and use that to generate a separate G-code for cutting the flat bottom?
    I use Inkscape and love it I know they have an inset and outset function that will make the change to the artwork which can be set to a value. Is this what you are taking about.

    Thanks again
    Tom

Leave a Comment

Your email address will not be published. Required fields are marked *

Scroll to Top